A POPULAR QUESTION I HEAR AMONG PHOTOGRAPHERS IS “HOW CAN I PRINT AN 8X10 WITHOUT IT BEING CROPPED?! I AM TRYING TO ORDER A PRINT AND IT’S CUTTING PEOPLE OFF MY PHOTO, HELP!!!”
In order to answer this question, a thorough explanation must be made on crop and aspect ratios.
What is an aspect ratio? In simple definition, it’s the ratio of the width and height of an image, video, or screen.
Have you ever noticed the blank screen around the movie you watched last? That just shows that the aspect ratio of the screen and the aspect ratio of the film are different, so the black compensates for the extra space without having to cut off parts of the film. This is just as true with photography.
But with photography, we crop the photo to suit the aspect ratio.
Instead of adding black around your photo to compensate for the various aspect ratios, we crop in order to print the size image that we need.
When you take a photo with your DSLR, the standard crop of your image is a 3:2 ratio. When you go to print a different ratio other than a 3:2, then you are going to get anywhere from minimal to extreme cropping depending on the size you are printing.

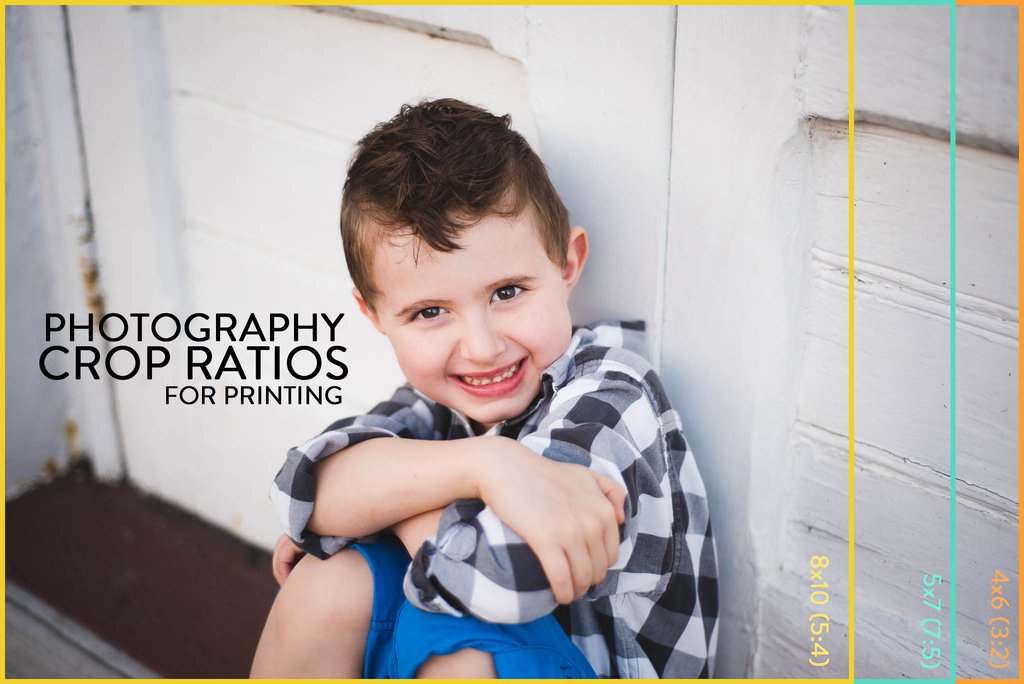
As you can see in the photo, the ratio for an 8×10 photo is vastly different than a standard crop (4×6).
YOU CANNOT PRINT A 8X10 PHOTO WITHOUT ANY CROPPING.
So while your 4×6 prints will have no cropping because they also share the same 3:2 ratio as your camera sensor, you’ll get a slight crop when you go to print a 5×7 photo, which has 7:5 ratio.
WHICH COMES TO THE ANSWER OF THE QUESTION FOUND AT THE BEGINNING OF THIS POST: YOUR 8X10 PHOTOS ARE BEING CROPPED SO HEAVILY BECAUSE IT DOES NOT SHARE THE SAME ASPECT RATIO AS YOUR CAMERA SENSOR.
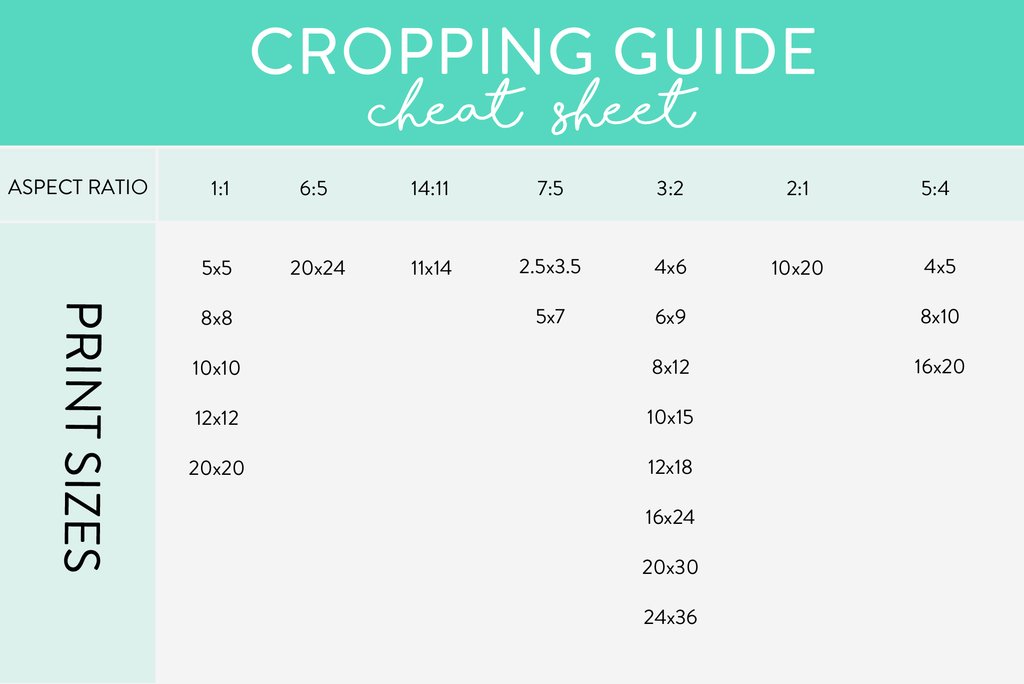
To make it even easier to see all your options when it comes to printing, I have provided a condensed list of ratios.
So next time you are wondering why your photos are being cropped, this chart could help you sum up just how much cropping you are getting and why.

Was this explanation helpful? Let me know in the comments below.
And if you liked this post, you might find these helpful too:
Take better portraits & learn how to get creamy skin tones.
Learn how to get blurry backgrounds in your images.
Keep these tips in mind to help you edit like a pro.
RAW Vs. JPEG, what’s the big deal with RAW photos?
The ultimate guide for taking the best DIY family photos: 12 tips from a professional

be the first to comment